🎓 Bundle Offer – Save 25% · CPD Certified Diploma Course + Advanced Masterclasses · Start anytime, self-paced or guided.
💶 Option 1: Pay in Full – €1,627.50 Enrol via Stripe
💳 Option 2: 12-Month Course Bundle Plan – €135/month 12-Month Plan via Stripe
💡 Bundle discount is only available through these Stripe links (not the regular WooCommerce checkout).
Tools and materials for cold perfuming soap with essential oils, including grated soap, mortar and pestle, glass bottles, and unscented soap bar.

Cold-Perfuming Luxury Soap with Essential Oils

Equipment & Materials For Cold-Perfumed Soap (Natural-Only)

This method is about adding your perfume AFTER saponification, with no heat once the essential oils go in. So the equipment is geared toward grinding, blending, and pressing — not cooking.


Materials (What you’ll need)

Soap Base (Unscented)

Choose ONE:

  • Fully cured, unscented cold-process soap (best texture + longevity)

  • Unscented hot-process soap (faster to make as a base)

  • Purchased unscented natural soap (or commission a soapmaker to supply 1–3 kg unscented blocks)

Important: the soap must be fully saponified and ideally hard/dry so it grinds cleanly.


Aromatic Materials (Natural-only)

You’ll build blends using:

  • Essential oils (top/middle/base notes)

  • CO₂ extracts (e.g., cacao CO₂, vanilla CO₂ — very potent)

  • Absolutes (preferably pre-diluted to 10% for easy blending)

  • Resins/resinoids (e.g., benzoin — best pre-diluted)

Optional (for performance):

  • Fortified citrus oils (e.g., Orange 10x, Bergamot FCF)


Optional Liquids (Tiny amounts only)

Used only if the mixture is too dry to bind:

  • Distilled water

  • Hydrosol (e.g., rosewater)

You are using this in drops, not splashes.


Anti-stick + finishing supplies

  • Cornstarch (light dusting for moulds/press release)

  • Neutral oil (tiny wipe for moulds/press if needed)

  • Wax paper / baking parchment (for resting soaps)

  • Glassine paper or waxed paper (for wrapping)

  • Airtight box/tin (for curing + scent preservation)


Equipment (The Tools)

Grinding & Prep (choose your setup)

Best option (small-batch luxury):

  • Heavy-duty food processor (Magimix-style) with tight-fitting lid
    This replaces industrial milling at home-scale.

Also useful:

  • Cheese grater (hand grater) or electric grater

  • Sharp knife + chopping board (for chunking soap)

  • Large mixing bowl (stainless is ideal)

If you’re going full traditional:

  • Mortar + pestle (stone/marble)

  • Carpenter’s plane (yes — if you’re being deliciously old-school)

Measuring Minimum:

  • Measuring spoons (tsp / ½ tsp / ¼ tsp)

Better:

  • Digital scale (0.1 g resolution)
    This is the easiest way to be accurate and stay safe.

Also handy:

  • Small glass beakers / shot glasses / jars for blending

  • Pipettes / droppers (one per oil if possible)

Mixing (no-heat method)

Depending on your style:

  • Food processor (short pulses to avoid warming)

  • Strong silicone spatula for scraping down sides

  • Gloves (nitrile) for hand-kneading and shaping

Optional but gorgeous:

  • Sturdy lidded container for resting “soap dough” briefly (keeps aroma in)


Extruding (optional, but improves texture)

Not essential — but helpful if you want that compact, “milled” feel:

  • Hand-crank meat grinder (dedicated to soap only)

  • Heavy-duty cookie press with wide opening

  • Manual caulking gun + wide tube (DIY extruder hack)


Pressing & Shaping 

Choose what you want to make:

A) Soap Balls

  • Round-bottom bowl or hemisphere mould for rolling smooth balls

  • Optional: two-part sphere mould for consistent shapes

B) Pressed Bars

  • Manual soap press / soap stamp (lever or screw press)

  • OR DIY pressing setup:

    • Loaf mould / pipe mould + flat tamper

    • Clamp / bench vice used carefully for pressure

Tip: A proper press gives the best “silky compact” finish.


Drying, Wrapping, Storage

  • Drying rack or tray (lined with paper)

  • Labels (even simple: name + date + scent family)

  • Airtight storage container for preserving top notes


Workspace + Safety Setup

You’re working with potent aromatic materials and a soap base. Keep it clean and controlled.

  • Good ventilation

  • Gloves and Eye protection (recommended when handling concentrated oils)

  • Paper towels + isopropyl alcohol spray for cleanup

  • Dedicated utensils (don’t reuse for food once used for soap/oils)

  • Notebook for recording every blend (you’ll thank yourself later)

Preparing a Fragrance-Free Soap Base

To start, you need a plain unscented soap base that’s fully saponified and cured. This will be the canvas for your perfume. You have a few options:

  • Cold-Process Soap Base: Craft a batch of cold-process soap using all-natural ingredients but omit any fragrance. Let it cure thoroughly (4–6 weeks) so it’s hard and dry. This gives a high-quality, long-lasting base.

  • Hot-Process Soap Base: Alternatively, make an unscented hot-process soap. Hot-process soap is ready to use sooner (you can use it as soon as it hardens, though a short curing time improves hardness). Ensure no fragrance is added during cooking.

  • Purchased Unscented Soap: If you don’t want to make soap from scratch, you can buy unscented soap. Look for a natural, dye-free, fragrance-free soap (often sold as “soap base” or by soap-making suppliers). You could even commission a local soap maker to produce a few kilos of plain soap for you.

Why not use “melt-and-pour” glycerin soap? Traditional melt-and-pour base isn’t ideal here. It’s formulated to melt easily (with extra glycerin), which also means it’s softer and must be heated to add scent. Adding essential oils to melt-and-pour involves heat, which would cause the delicate top-note oils to evaporate – exactly what we want to avoid. We need a soap that can be reworked without heat, so stick to fully cured cold or hot process soap. The best base, as 19th-century perfumers noted, is a high-quality neutral soap (often called “curd soap”) with no scent or colorgutenberg.org. In other words, use the finest, whitest soap you can for optimal results.

Grinding the Soap to a Fine Powder

The key to infusing fragrance without heat is to get the soap into a fine, blendable form. In commercial “triple-milled” soap making, this is done with heavy-duty rollers and chippers – but we can mimic that on a small scale with some elbow grease and clever tools. The soap must be finely ground or shaved so that essential oils can be evenly distributed.

Traditional method: Perfumers of the past used simple carpentry tools for this. G.W. Septimus Piesse (1857) describes a method of planing the soap into thin shavings using a common carpenter’s plane, letting the curls fall into a mortargutenberg.org. This yields very fine soap flakes. The flakes were then crushed and mixed in a marble mortar with a pestle – a labor-intensive process: “small batches…involving merely mechanical labor” with a plane and mortargutenberg.org. The effort was worth it, since no heat was involved to damage the fragrance.

Modern approach: You can achieve the same result with a food processor or similar kitchen appliance. An old-style heavy-duty food processor (e.g. a Magimix) works well. Here’s how to do it:

  1. Shred or Chop First: Cut the soap into small chunks or use a hand grater to make coarse flakes. This prevents overloading your machine. (If you don’t have a machine, you could grate the entire batch by hand with a fine grater – tedious but effective. A food processor just speeds it up.)

  2. Optional – Soften Hard Soap: If the soap is very aged and rock-hard, lightly mist the shavings with a bit of distilled water or rosewater. Piesse advised 1–3 ounces of water per pound of soap if the soap had dried out in storagegutenberg.org. Don’t drench it – just a light sprinkle. Seal the grated soap in a container or bag and let it sit overnight. This makes the soap slightly pliable for grinding, and the water will fully absorb. (Using rosewater instead of plain water can impart a subtle natural rose aroma as a bonus.)

  3. Grind to Powder: Load the prepared soap shreds into your food processor. Cover the lid tightly – we’ll be adding essential oils next, and you don’t want any aroma escaping. Pulse and process the soap in short bursts. The goal is to create a fine, crumbly powder with a consistency like coarse cornmeal or doughy crumbs. Avoid overheating the soap while processing; if your processor motor runs too long, it can warm up the soap. To be safe, pulse in bursts and give the machine a break if you feel heat. We want the soap as cool as possible.

  4. Manual Alternatives: If you don’t have a sturdy processor, you can revert to the historical method: use a mortar and pestle or even a sturdy bowl and a heavy-duty spoon or mallet. Crush the grated soap until it’s in tiny pieces. It takes time (Piesse jokingly calls it “a couple of hours of warm exercise” to get the soap, but it does work}. Another tool improvisation: an old-fashioned meat grinder (hand-cranked mincer) can grind soap flakes into noodles; you could run the soap through a couple of times, changing direction, to get a fine texture. The finer the soap particles, the better the essential oils will mix in.

At the end of this step, you should have a bowl of finely ground soap that can pack together if you squeeze it (similar to slightly damp sand). Now we’re ready for the most important part – adding the fragrance.

Incorporating Essential Oils (Cold Perfuming Method)

Now comes the “perfumery” part of the process. You will add your blend of all-natural essential oils to the ground soap without any heat. This method is sometimes called “cold scenting” or “milling in” the fragrance. By avoiding heat, we preserve even the most delicate top notes that would normally evaporate. In fact, in the 19th century it was observed that about 20% of the perfume could be lost if added to hot soapgutenberg.org – a huge waste of precious essences. That’s why all highly scented luxury soaps were perfumed cold.

Follow these steps to combine the essential oils with your soap powder:

  1. Measure Your Essential Oils: Determine how much and what combination of essential oils you’ll use. This depends on your recipe and personal preference, but a rule of thumb for strong scent would be around 3–5% of the soap’s weight in essential oils (e.g. ~0.5 oz of EO per pound of soap, though you can go a bit higher for very volatile oils). Since we’re using only natural EOs, you might blend several to create a more complex fragrance. Example: For a citrus-floral soap, you might use a mix of bergamot, orange, and a touch of rose or jasmine. It’s wise (though not mandatory) to include a small percentage of a base note oil or fixative (like patchouli, vetiver, benzoin, cedarwood, etc.) to help anchor the volatile top notes. Classic perfumers often did this: for instance, one 1850s recipe for otto of rose soap used 1 ounce of pure rose oil, but also 2 ounces of musk tincture and a little sandalwood and geranium oil, blended into 4½ lbs of soap. The musk and sandalwood are fixatives that help the rose scent last. So consider the overall fragrance profile for longevity. But no synthetic fragrance oils – we’re keeping this 100% natural as you requested.

  2. Add Oils to the Soap: Pour or drizzle the measured essential oils evenly over the bowl of powdered soap. Work in small batches if needed – for example, if you have 2 kg of soap, you might do 1 kg at a time so you can mix thoroughly. Once the oils are added, quickly cover the processor or bowl. Essential oils are highly volatile, especially the top notes; you will literally see some vapour if left open. We want all that goodness to soak into the soap, not scent your kitchen air.

  3. Mix Thoroughly: If using a food processor, pulse and run it in short bursts to start blending the oils into the soap. It will gradually go from dry crumbs to a damp, clumpy texture as the oils distribute. You may need to stop and scrape down the sides to ensure everything mixes evenly. Continue until it starts to form a dough-like mass. If the mixture seems too dry (not coming together at all), you can add just a few drops of water or hydrosol (like rosewater) and continue mixing. Be cautious – too much liquid will turn it to mush; you just want it barely pliable. If mixing by hand or mortar, use a strong spoon or pestle to knead and mash the oils into the soap. This is hard work, but make sure to stir and press repeatedly. The goal is a homogeneous scented soap “dough” with no dry patches. Historically, after adding perfume, the mortar and pestle work went on for quite a while until the soap was “free from streaks, and of one uniform consistency”gutenberg.org. Every particle of soap should now carry the fragrance.

  4. Rest (Optional): At this point, you have a pliable, perfumed soap mass. You might let it rest covered for an hour or two, which can help the essential oils bind and mellow into the soap. This isn’t strictly necessary, but some artisans feel it improves integration. Keep it covered to prevent scent loss if you pause here.

Tip: Throughout the mixing, keep everything as cool as reasonably possible. If your workspace is very warm, consider mixing in a cool area. Some people even chill their equipment (bowls, blades) beforehand. You’ve done well avoiding heat – the mixture may warm slightly from friction, but you definitely should be smelling the rich aroma as proof that the oils are in the soap, not in the air.

At this stage, congratulations – you’ve essentially done what the soap factories do when they “mill” soap with perfume, only on a kitchen scale! In fact, perfumers would sometimes use a device like a small chocolate mill or cocoa-flake mill to do exactly this mixing for larger batchesgutenberg.org. Any contraption that can mix a paste and crush lumps was fair game. You’ve improvised with modern tools to achieve the same result: a well-blended, scented soap ready to be formed.

Extruding and Pressing the Scented Soap

Now it’s time to take that fragrant soap dough and form it into beautiful soaps. In commercial triple-milled soapmaking, the perfumed soap is usually put through an extruder (plodder) which presses it into long billets, then cut and stamped into bars. We can approximate these steps too. The key is to press the soap into a dense shape – whether that’s a bar or a ball – so it hardens into a smooth, cohesive piece.

Optional – Extruding (Homemade style): If you have access to a simple extruding tool, you can use it to refine the soap texture further. For example, a hand-crank meat grinder or a heavy-duty cookie press with a large round opening can act as a miniature soap extruder. Load the soft soap mass and crank or press it out; it will emerge as noodle-like ropes or logs. This step isn’t strictly required, but it can help align the soap fibers and ensure no air pockets. (It’s the same idea as the “ribbons of soap” Piesse describes coming out of the millgutenberg.org.) If you do extrude ropes of soap, catch them on a tray and then gather and knead them together into one mass again.

Whether or not you extrude, you now have a chunk of perfumed soap ready to shape. Here are a couple of approaches:

  • Hand-Rolled Soap Balls: Since you mentioned soap balls, let’s start there. Take a portion of the perfumed soap mass (weigh it if you want uniformly sized balls – e.g. 100g for a medium ball). With gloved hands, squeeze and roll it between your palms firmly. It will have a consistency like firm cookie dough or soft clay. As you roll, press in on the ball to eliminate cracks. A small sprinkle of water or rosewater on your gloves can help the surface become smooth as you finish the shape (you likely already do this, as you mentioned). You can also use a tool to assist: some artisans use a round-bottom bowl or a hemispherical mould – place the rough ball inside and swirl it around with pressure. This acts as a “ball press” to refine the sphere. In the Victorian era, there were even tools called soap ball scoops or presses for making perfectly round soap balls, since round “toilet balls” were popular before bar soaps. If you have two matching half-sphere moulds, you can pack each half, then press them together to form a sphere. The goal is a nicely compacted round soap. Once formed, set the ball aside on a sheet of wax paper.

  • Pressed Bars (Tablets): For a more traditional bar shape, you’ll want to press the soap into a mould or use a soap press. If you have a manual soap press or stamp, you can place a chunk of the soap dough (pre-weighed for consistency) into the press mould and pull the lever or screw down the press to compact it. Many small soap presses are available (some even foot-operated) that can stamp out oval or rectangular bars with a design. If you don’t have a professional press, you can improvise: pack the scented soap tightly into a loaf pan or pipe mould, pressing down hard (use a flat object to compress it). After a day or two (when it hardens a bit), you can pop it out and slice into bars. While still somewhat malleable, you could use a heavy object to impress a pattern or use a cookie-cutter for shapes. Even a clamp or vice can serve to press a mould if carefully applied. The main idea is to apply firm, even pressure to get a solid bar.

Preventing Sticking: No matter what mould or press you use, the fresh soap can be a bit sticky. A trick from the old manuals: lightly dust the mould and the surface of the soap with starch powder (cornstarch) before pressing, or lightly oil the mould with a neutral oilgutenberg.org. This prevents the soap from gluing itself to the mould or stamp, so your finished piece releases cleanly without tearing. (Just a thin dusting – you can brush off any excess starch from the finished soap later.)

After forming, carefully remove the soap from the mould or press. If you made bars, you might have a beautifully embossed tablet; if balls, you have smooth round soaps. They will be a bit softer now due to any extra moisture and the mechanical working, but they’ll harden up.

Curing and Preserving the Fragrance

Lay out your freshly formed soaps on a sheet of clean paper or a drying rack. It’s best to keep them unwrapped in a well-ventilated area for 24-48 hours so they can firm up. The soap will lose any added moisture and become as hard as it was before (often even harder, as milled soaps are quite dense). After a day or two, the soaps should be dry to the touch and ready to use or store.

To preserve those precious top-note scents, store the finished soaps in a closed box or wrap them in wax paper and then in an airtight container. This traps the aroma. Many makers actually age their scented soaps for a week or two in a closed box – this helps the fragrance mellow and fix into the soap. The scent can even improve as the essential oils marry with the soap base. When you open the box, you’ll get a delightful whiff each time.

Remember that even with all these precautions, very volatile top notes (citrus, florals, etc.) will gradually evaporate on the shelf. By avoiding heat, we’ve kept the maximum initial strength – none of your citrus zing or delicate florals were cooked off (a huge advantage, since hot-added perfume loses ~20% right off the bat). Still, over months, you might notice some fading of the high notes. This is normal. It’s another reason to include some base or middle notes in your blend to act as fixatives. For example, a touch of benzoin resin or a woody note can slow the evaporation of those light molecules. In the old days, perfumers solved this by blending notes – e.g. the rose+musk combo mentioned, or citrus oils anchored with a bit of patchouli. By crafting a balanced natural fragrance, your soap’s scent will linger longer in storage and on the skin.

Finally, when using or selling/gifting these soaps, package them well. A tightly wrapped soap (in paper or shrink wrap, though with natural vibes you might use glassine paper and a box) will retain its aroma until opened. An unwrapped soap left in open air will scent the room, but eventually lose potency.

Embracing Vintage Techniques for Natural Scented Soap

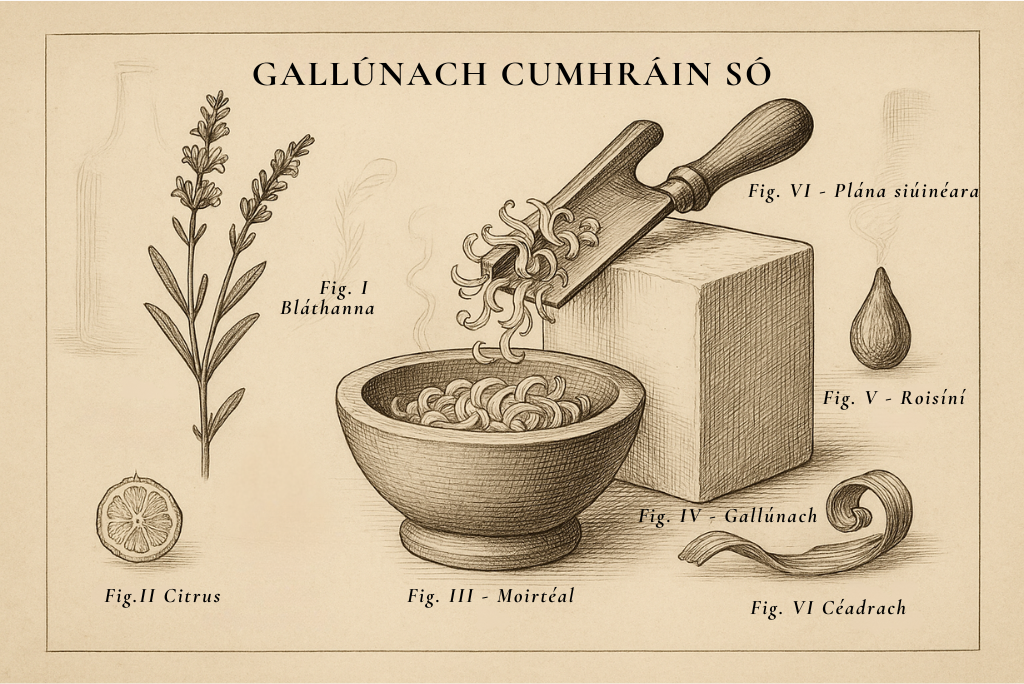
By avoiding heat at the perfume stage, we kept every nuance of your natural essential oils intact. We also used mechanical methods – grinding, extruding, pressing – just as was done on a larger scale with classic equipment. (In Piesse’s time, a simple setup with a plane, mortar, and hand-press was “exceedingly convenient and economical” for small batchesgutenberg.org.) With some creativity, those vintage methods can be adapted to a home workshop or lab.

To recap the benefits of this process:

  • Preserved Fragrance: Delicate top notes and natural essences aren’t lost to heat. The soap smells true to the original oils, especially at first use when the burst of top notes is strongest.

  • Rich, Complex Scent: You can incorporate essential oil blends that would be impossible in hot-process soap (because they’d flash off). Think of real jasmine, citrus, neroli, etc. – they’ll smell brighter. If you included base notes, you have a full spectrum of aroma that lingers on the skin.

  • Smooth, Dense Texture: The act of milling and pressing tends to create a very smooth, hard bar. Your soaps will likely be denser and longer-lasting in the bath than a regular cold-process bar. This is why commercial “triple-milled” soaps are prized – you’ve effectively done a similar thing. By shaving and recombining, you’ve removed excess air and created a tight matrix. (Historically, the soap “flakes or ribbons” from the mill were pressed into one solid mass and moulded. We achieved that with our grinding and hand-pressing.)

  • All-Natural & Custom: Perhaps best of all, your soap contains only natural ingredients – no synthetic fragrances, just the essential oils you chose. And you have complete control over the scent blend. This is a truly artisanal product, made with a nod to traditional perfumery and soapmaking knowledge.

In summary, to create highly scented natural soaps without using heat – you just need to employ mechanical techniques instead. By using a food processor (or mortar and pestle) to finely pulverise the soap, then blending in essential oils while cool, and finally extruding/pressing into shape, you’ve replicated on a small scale what the big soap factories do with huge machines. The result is a “perfumed soap” in the truest sense. This approach was well documented in older soap-making texts and you’ve improved on the common internet recipes by going back to those roots and equipment. Enjoy your uniquely crafted soap – when you lather up, those top-note essences should bloom beautifully, “making luxury naturally perfumed soaps for top notes, baby!” 😄

Remember that a century-and-a-half ago, a perfumer wrote that “all the very highly scented soaps” were always scented cold to avoid losing the volatile oils. You’re in good company with the masters of old. Happy soap perfuming!

Sources: Historical soap perfuming techniques and recipes are drawn from G.W. Septimus Piesse’s The Art of Perfumery (1857), which details cold added scents and small-scale soap milling  as well as insights from traditional soapmaking practices. These vintage methods demonstrate the principles behind the modern process we implemented. Enjoy the fusion of history and craft in your naturally perfumed soaps!